Soundproof for Y.8001
Area of Application
• Designed for walk-in and barrier-free showers in both residential and commercial projects.
• Suitable for domestic bathrooms, hotels, spas, wellness centres, saunas, sports facilities, and swimming pool shower areas.
• Applicable for floor finishes in ceramic, natural stone, or large-format tile.
• Compatible with common waterproofing membranes and suitable for full wet-room integration.
• Suitable for projects with a minimum installation depth of 60 mm
• Engineered to accommodate high water flow rates while incorporating an integrated odour trap.
• Recommended for renovation as well as new-build projects, thanks to its low installation depth.
• Allows installation along the wall.
• Delivers an efficient drainage system that combines hygiene with ease of cleaning for demanding wet-area applications.
• Made of 304 stainless steel, ensuring long-lasting durability in indoor wet areas. (For coastal or heavily chlorinated environments, 316 stainless steel is recommended.)
Specifications
• Frame and cover made of 1.4301 stainless steel V2A
• Flange with factory-applied waterproof sealing membrane for integration into the GRUEN smart sealing system (abP-certified bonded waterproofing system
• Complete set for direct installation
• Low installation height starting from 60 mm.
• Excentrically adjustable drain body for fine positioning of the stainless steel frame (PYS)
• Convenient alignment through patented leveling and spacer corners
• Highly efficient odor trap system
• With an integrated construction protection cover featuring a funnel function for waterproofing and connection testing
• 360° rotatable drain body, DN50 outlet on both model
Delivery Scope
• Complete set for direct installation
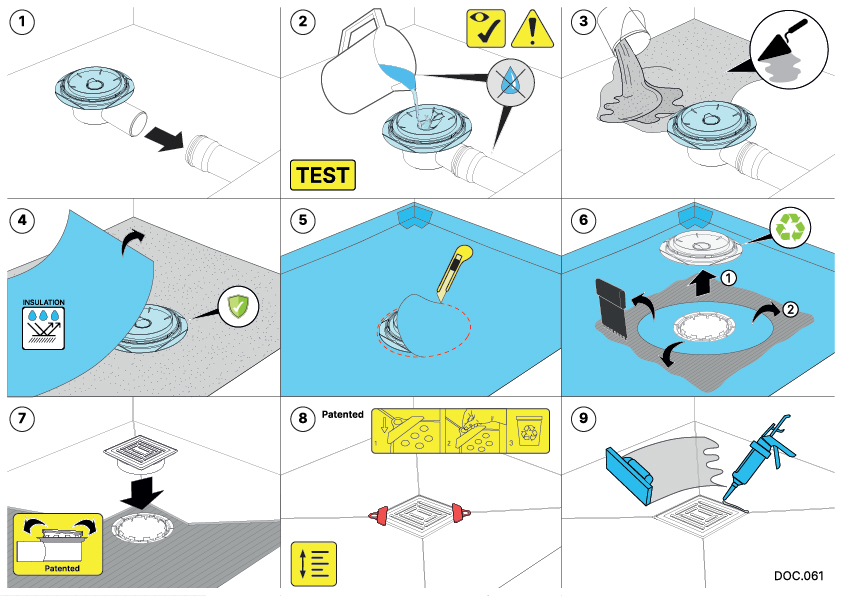
• Connect the floor drain body to the waste pipe.
• Perform a leak test to check for any leaks at the connection points.
• Prepare the mortar and ensure all gaps are filled. You can use the edges of the protective cover as a guide for alignment.
• Carry out the waterproofing process using the waterproofing membrane.
• Cut the parts of the membrane that overlap with the floor drain.
• Remove the temporary protective cover and apply the body-integrated membrane over the waterproofing membrane that covers the entire surface.
• Position the floor drain and cover within the body. Its patented eccentric structure allows for angular adjustment, enabling precise alignment in any direction.
• During the ceramic tile application, use the tile levelings for proper alignment. After the tiles have adhered, you can easily pull and break them off.
• Apply grout to the gaps between the ceramic tiles.
General Cleaning and Maintenance Guidelines
• Cleaning Frequency: Clean the drain and cover at intervals ranging from once a week to once a month, depending on usage intensity and local water hardness/contamination conditions. Shorten this interval in high-traffic applications.
• Cleaning Agents: For stainless steel surfaces, use pH-neutral or mild household cleaners. Avoid products containing strong acids (such as chlorine, hydrochloric acid, hydrofluoric acid) or highly alkaline substances.
• Cleaning Tools: Use soft microfiber cloths or sponges. Hard brushes, steel wool, or wire brushes will scratch the surface. Do not spray or pour cleaning agents directly onto the product; apply them to the cloth first and then clean the surface.
• Brushed / Textured Surfaces: Always clean brushed finishes in the direction of the grain to maintain the original surface appearance.
• Rinsing and Drying: After cleaning, thoroughly rinse all detergent residues with clean water. Dry the surface with a soft cloth to prevent water spots and staining.
• Siphon and Odour Trap Maintenance: Periodically remove the cover and siphon components to clear accumulated hair, soap residue, and other deposits. Regular cleaning helps prevent blockages and unpleasant smells.
• Protection and Corrosion Prevention: Avoid direct contact with other metallic surfaces. Do not leave mortar or cement residues on the product, as these can cause long-term surface damage.
• Surface Finish Compatibility: Select cleaning agents and tools suitable for the specific surface finish (polished, matte, or brushed). For example, polished finishes are more sensitive to scratches.
• Surface Finish Compatibility: Select cleaning agents and tools suitable for the specific surface finish (polished, matte, or brushed). For example, polished finishes are more sensitive to scratches.